 |
| Layer #1 |
I was curious about Jane Davies' "Radical Collage", as described on her
blog. which involves the use of a sander to deconstruct multiple layers of collage. And I was intrigued by Peter Sacks' works, which are composed of many layers of collaged paper, text and cloth, and which I
wrote about a few weeks ago.
 |
| Layer #2 |
So when it came time to lay out the parameters for Lesson 4, I decided that I would see what would happen if I took a sander to my collage. Otherwise, I wanted to continue with neutral colours, pattern, line, and the contrast of busy areas with quiet spaces.
 |
| Layer #3 |
I pulled out piles of collage papers, including wallpaper and vintage text books. I reclaimed six birch cradle boards, 10 x 10, on which I had mounted earlier colour studies. I bought a product called Sandable Hard Gesso from Golden, mentioned on Jane's blog post. The manufacturer's website advised it was best used on a rigid surface, hence the birch cradleboards. As the sides had already been painted black, I protected them with green painter's tape.
 |
| Layer #4 |
And I got to work, cutting and tearing materials to collage into place with acrylic gloss medium. In the end, each board had four layers of collage. I worked in a rough grid format, using rectangles of various sizes, placed randomly. All had to be perfectly dry before applying the sander, a cute little hand-held number borrowed from my son-in-law.
 |
| hand-sized sander |
Even using the coarse grade of sandpaper, I never got past the second or third layer. Papers that had wrinkled a bit when collaged looked striped when sanded. Others developed a kind of "blotchy rash". The edges in particular took a beating. The cloth bits were the most resistant to sanding. The result was completely unpredictable, which was fun. And challenging.
 |
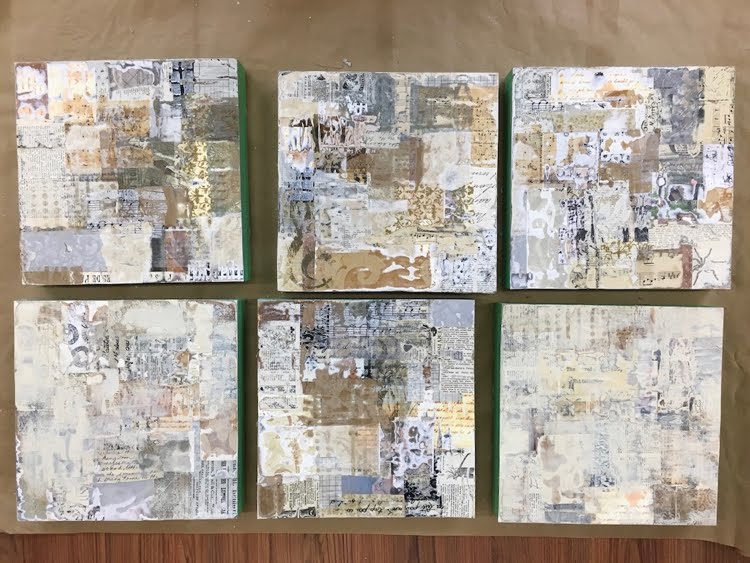
Top row, left to right, #1 - 3. Bottom row, left to right, #4 - 6.
Each 10 x 10 board has four layers of collage. At this point they've been sanded,
and #4 and #6 have a bit of paint on them. |
The general appearance of the sanded pieces was "vintage", because of the papers I had used as collage material: mostly beige, with small print. If I had used white papers with large, modern typeface, the feeling would have been more contemporary. Because of this "antique" quality, I was tempted to finish these off with cut-out botanical prints (a rose, an apricot branch in bloom) or a butterfly, but decided that this was not the direction I wanted to pursue.
Instead, I reverted to my "cityscapes" theme. Carbon black paint established the sky background, sometimes further sanded down to create ambiguity. Masses of buildings emerged and were defined with patterning and line. Stencils, stamps, painters' tape, marker, paintbrush, water-soluble crayon and charcoal were all put to use. Further sanding and collage ensued. I wanted to retain the character of the "deconstructed" materials, not covering up too much. The impression is one of "A City in Ruins".
Here are the results:
 |
| #1 |
 |
| #2 |
 |
| #3 |
 |
| #4 |
 |
| #5 |
 |
#6. This one has the least amount of paint and patterning added to the
deconstructed collage surface. Just a few lines to suggest shapes. |
I consider these to be works in progress, and hope to have another go at them soon. Something about the black seems a bit harsh. Can I make it richer, somehow? Perhaps I can create some transitional areas between the busy patterning of the collage and the quiet space of the background. Might introduce a few touches of colour too. Stay tuned!


3 comments:
Now this is really cool! I wonder if one collages fabric in with the paper...maybe using some matte gel for adhesive...and/or a layer of gesso...Hmmmm...possibilities!
It is cool, Margaret! You should give it a try. I found the fabric is more resistant to sanding than paper.
Really nice progression and explanation.
Thank You Heather.
Post a Comment